So you have some text that contains both Arabic and English languages at the same time? and having difficulty aligning it because sometimes it starts with english, and other times it starts with Arabic?
The following example illustrates
– this problem 🐛
– some hacky way to solve it 👺
– and the correct way to solve it 🧐.
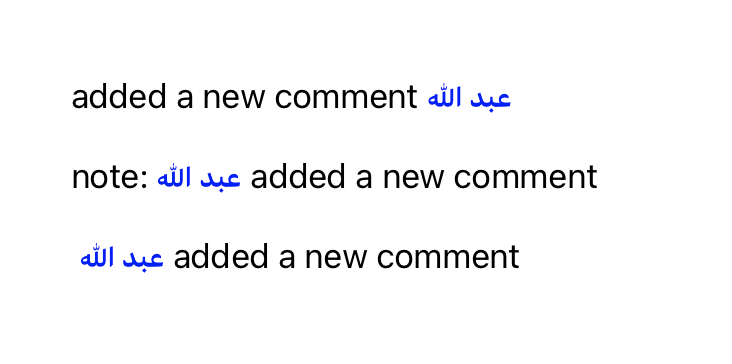
Top line: shows a line that is being rendered incorrectly, because the first word is Arabic, and you are expecting it to show up on the left, but it’s not 🤦🏻.
Middle line: one hacky way to solve this, is to start your text all the time with a LTR word, not the best solution 👺
Bottom line: this is showing up correctly, because it’s adjusted using unicode markers.
Unicode characters set offers two marker characters (LTR: 0x200E, RTL:200F). These are invisible, but control the direction, I just need to add this \u{200E} to force the wrapping direction.
Playground example:
import UIKit
import PlaygroundSupport

extension String {

    func withHighlighted(word: String) -> NSMutableAttributedString {
        let attributes = [
            [NSAttributedString.Key.foregroundColor:UIColor.blue],
            [NSAttributedString.Key.font: UIFont.boldSystemFont(ofSize: 14)]
        ]

        let range = (self as NSString).range(of: word)
        let result = NSMutableAttributedString(string: self)
        for attribute in attributes {
            result.addAttributes(attribute, range: range)
        }
        return result
    }

}

class MyViewController : UIViewController {

    override func loadView() {

        let view = UIView()
        let topLabel = UILabel()
        let middleLabel = UILabel()
        let bottomLabel = UILabel()

        topLabel.frame = CGRect(x: 40, y: 40, width: 300, height: 20)
        middleLabel.frame = CGRect(x: 40, y: 80, width: 300, height: 20)
        bottomLabel.frame = CGRect(x: 40, y: 120, width: 300, height: 20)

        let word1 = "عبد الله"
        let word2 = "added a new comment"
        let adjustor = "\u{200E}"

        topLabel.attributedText = "\(word1) \(word2)".withHighlighted(word: word1)
        middleLabel.attributedText = "note: \(word1) \(word2)".withHighlighted(word: word1)
        bottomLabel.attributedText = "\(adjustor) \(word1) \(word2)".withHighlighted(word: word1)

        view.addSubview(topLabel)
        view.addSubview(middleLabel)
        view.addSubview(bottomLabel)

        self.view = view

    }

}

PlaygroundPage.current.liveView = MyViewController()